Pydio Cells を Docker で立てて Nginx でリバースプロキシする
家庭用のファイルサーバを Synology NAS から CentOS な物理サーバにリプレイスするついでに、クラウドライクに使えるよう Pydio Cells を構築したので備忘録。
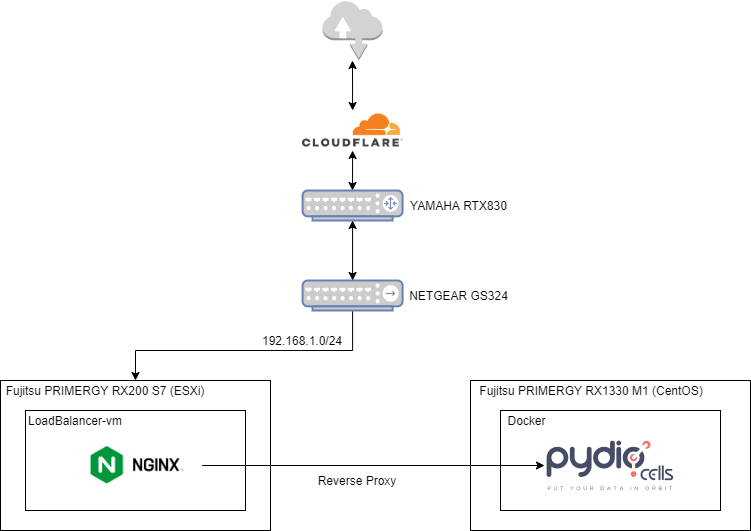
ざっくり構成図

Docker でサクッと Pydio Cells をたてる
version: '3.7'
services:

  cells:
    image: pydio/cells:latest
    restart: unless-stopped
    ports: ["8080:8080"]
    environment:
      - CELLS_LOG_LEVEL=production
      - CELLS_BIND=0.0.0.0:8080
      - CELLS_EXTERNAL=https://<IP address or Domain Name>
      - CELLS_NO_TLS=1
    volumes:
      - /data/cloud:/var/cells/data
      - /opt/docker/pydio-cells/volumes/cells:/var/cells

  mysql:
    image: mysql:5.7
    restart: unless-stopped
    ports: ["3306:3306"]
    environment:
      MYSQL_ROOT_PASSWORD: P@ssw0rd
      MYSQL_DATABASE: cells
      MYSQL_USER: pydio
      MYSQL_PASSWORD: P@ssw0rd
    command: [mysqld, --character-set-server=utf8mb4, --collation-server=utf8mb4_unicode_ci]
    volumes:
      - /opt/docker/pydio-cells/volumes/mysql:/var/lib/mysql
Nginx でリバースプロキシする
Pydio Cells が動くサーバは外部からアクセス出来ないため、ロードバランサ用の VM からリバースプロキシしてあげる。
upstream pydio-cells {
    server 192.168.1.xxx:8080;
}

server {
    listen 80;
    server_name <Domain Name>;
    root /var/www/html;

    access_log   /var/log/nginx/cloud_access.log main;
    error_log    /var/log/nginx/cloud_error.log warn;

    error_page   500 502 504  /50x.html;
    error_page   503          /503.html;

    location = /50x.html {
        root   /etc/nginx/html;
    }

    location = /503.html {
        root   /etc/nginx/html;
    }

    #### Secure ####
    add_header Referrer-Policy "no-referrer" always;
    add_header X-Content-Type-Options "nosniff" always;
    add_header X-Download-Options "noopen" always;
    add_header X-Frame-Options "SAMEORIGIN" always;
    add_header X-Permitted-Cross-Domain-Policies "none" always;
    add_header X-Robots-Tag "none" always;
    add_header X-XSS-Protection "1; mode=block" always;
    fastcgi_hide_header X-Powered-By;

    #### Location ####
    fastcgi_read_timeout 60;

    gzip off;

    location / {
        proxy_redirect          off;
        proxy_set_header        Host                   $host;
        proxy_set_header        X-Real-IP              $remote_addr;
        proxy_set_header        X-Forwarded-Proto      $scheme;
        proxy_set_header        X-Forwarded-Host       $host;
        proxy_set_header        X-Forwarded-Server     $host;
        proxy_set_header        X-Forwarded-For        $proxy_add_x_forwarded_for;
        proxy_set_header        Upgrade                $http_upgrade;
        proxy_set_header        Connection             "upgrade";
        proxy_request_buffering off;
        proxy_pass              http://pydio-cells$request_uri;
    }
}
Pydio Cells は裏側で WebSocket を使って通信しているので、
proxy_set_header Upgrade $http_upgrade;
proxy_set_header Connection "upgrade";
を突っ込んでおく。
完成!
https://<Domain Name> へアクセスしたらセットアップ画面が表示されるはず。
